Dramatic Contexts
By Kate Garrett
Flat Pieces.
What is a Flat Piece?
It is a type of prosthetic where th edesign is sculpted onto a flat surface such as a tile then cast and moulded ontop so that the finished result is a prosthetic piecs with a flat bottom.
Why do we use flat pieces?
Flat pieces are a quick way of producing prosthetic pieces for mass production or one off pieces. They are not made for a specific individual so can be useful of a set or in your kit.
Pros
Quick to make
The mould can be used multipul times
Useable on any person


Application methods.
Here I am going to look at 3 methods of applying flat pieces there are many variations of these, however i am picked the 3 stapple methods to explore; each one has it's advantanges and disadvantages making them more suitable in different suituations.
Direct Application/Transfers.
Preperation:Pre fill the mould either with bondo the night before and leave out to dry over night or use the dehyrator method as used in (Stan winston DVD)
Pros: Very quick, transparent (if using Bondo) so can be used with having to skin match after, seamless edges, can be used for both one off and continuity pieces, mould can be used multiple times.
Cons:
Suitable materials: Bondo or Silicone
Application Method.
1-Apply pros aide to the transfer and press on the skin and remove as to leave a adhesive impression. Allow to dry until clear- using a hairdryer will speed up the process.
2-Press the piece back onto the same spot where the adhesive was applied.
3- Peel off the mould to reveal the transfer attached to the skin.
4- Use IPA to bleed any untidy edges off. At the stage you may want to apply sealer to prevent the piece from absorbing any colour, if you do remeber to powder to take away the shine.
5- Colour as required with skin illustrator.
Direct Transfer Demo by Pete Tindall
Frame Method.
Preperation: Once the piece has been made create a cardboard shaped frame to suit the piece and glue the piece onto it making the cap plastic a little taught to keep a flat bottom.
Pros: Good for one off visuals, quick to apply, easy to store, can have multipul ready for use from one mould.
Cons: Prepeation is longer than other methods, not good for continuity.
Application method.
1- Apply pros aide to the transfer and press on the skin and remove as to leave a adhesive impression. Allow to dry until clear- using a hairdryer will speed up the process.
2-Press the piece back onto the same spot where the adhesive was applied.
3- Against the inside edge of the frame bleed away the cap plastic with IPA until the frame has been removed. Tidy any edges that need it.
4- Colour as required using skin illustrator.
Frame Method Demo by Pete Tindall
Traditional Method.
Preperation: Flat piece removed from the mould (loose with no support)
Pros: Persise, you control it entirely.
Cons: Harder to stop cap plastic from wrinkling, longer than the other methods.
Application Method.
1-Apply pros aide to the transfer (the part that was sculpted) and press on the skin and remove as to leave a adhesive impression. Allow to dry until clear- using a hairdryer will speed up the process.
2-Press the piece back onto the same spot where the adhesive was applied.
3- Around the edges (the cap plastic section) apply pros aide transfer on to the skin then dry before pulling taught and pressing down onto the skin.
4- Bleed the edges- depending on what sort of cap plastic you use will determine weather you dissolve with IPA or acetone. (Refer to Material Bible)
5- Colour as required with skin illustrator.


Flat piece out of the mould - pre application
Grounding Up.
The aim is to make a good clean channel around the sculpt which enables you to mould the flat piece. The moulding is the most important part as A BAD MOULD=A BAD PIECE so grounding up correctly and neatly is improtant.
1. Roll a thin sausgae and flatten so that it is a rectangle shape or you can use a clay extruder witha similar end to achieve a more percise and neat result.
2. Place a few centermeteres away (maximum 2cm) from the edge of the sculptand press onto the surface, keeping the same distance all the way round.
3. Use a fine ended sculpting tool such as... and clean up the edges.
4. Then create a wall using the same technique placing it a few centremeters away from the first channel being at least equal hight to the highest point of the sculpt if not slightly higher. To secaure this to the tile use a flat edged sculpting tool and push down the outside edge to the tile.Then smooth out the inside edge by using the sma etool and ushing it along the tile/wall this will push the clay firmly onto the tile whilst keeping a smooth clean cut edge.
5. Check there are NO HOLES. otherwise in the moulding process you will have leaking.

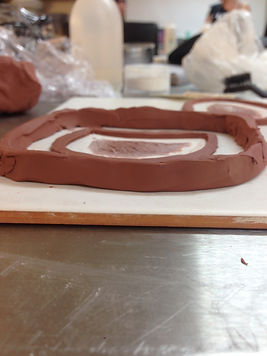

The Channel- not the height and postion in relation to the sculpt
The wall- pre attached to the tile
The finished grounding up- wall has been attached to the tile and finsihed/cleaned
Moulding making.
Creating the mould for this is on the Mould making tab.
Creating the piece.
Estimating Silicone Weight needed.
If in total you need 30 grams of silicone at 200% softened then you will need:
A-5 grams
B-5 grams Total - 10 grams
C (softner)- 20 grams 200% is twice the total of A & B
To make this to 150% softened you would need to 15 grams of C and to make it 100% you would need 10 grams of C (the total of A and b combined).
Method.
1. Using addition/platinum silicone to create the piece. You need to use equal parts of A and B of Rubber Pro Gel 10 from Ps composites (or an alternate platinum silicone product) These need to be the exact same weight (grams) otherwise it will not work properly. Place cup A onto the scale and press tear, this will zero the scale so you are only measuring the product not the cup aswell. Measure out silicone A.
2. Repeat for Silicone B and C the softner.
3. Cover the mould with a mould release such as vaseline, then witha tissue stipple off any excess. stippling will enhance the texture created in the sculpt if you wiped then lines may appear in the cap plastic which would not match the skins natural texture.
4.Mix 1 part Cap plastic (alcohol based as I will be dissolving with IPA) to 3 parts IPA to make a runny mix. Then pour over the piece and swirl around to cover the entire mould or you can use a brush and paint it on. Then allow to dry or put under a hood dryer to speed up the process. You will need to have 2-3 thin layers.
5. As you can see on 3 spatulars write A, B, C and a dot at the opposite end.
6. With the corrosponding spatular apply a tiny drop of pigment into the silicone and mix thoughly to colour. Lift the stick out and count to 10 the dot should be slightly visable (as your veins are in your wrist). Repeat for B and C. If the dots aren't the same visability the you have either over or under pigmented one. However if you have over pigmented one then underpigmenting another will compensate for this .
7. You can either do this prior to mixing them all together or before. Add red flocking, to warm up the skin colour or blue to cool it, and mix thoughly this gives the silicone a more natural look. Then mix all 3 cups together if you havent already done so.
8. Pour it into the flashing first then the sculpted piece so it is over filled.
9. Then with a flat edge such as a tapping knife or a spatular edge and pull across the piece to remove the excess and set aside to cure.
10. Then using the same cap plastic and IPA mix as before add another layer on the cured silicone to seal it, and allow to dry.
My work amounts of silicone.
A - 20 grams
B - 20 grams
C (softner) - 80 grams
This is 200% softened and in total 120 grams of silicone.
Cons
It isnt custom made for your model
Flat piece- Post application & colour (by me)