Dramatic Contexts
By Kate Garrett
Mould Making Preperation.
Grounding.
This is a process which is done after your have finished a sculpt, this processis called grounding up but consists of making flashing. touch downs, the cutting egde and the wall.
Method.
1- Roll a flat sausage or use an extruder to create the grounding piece and follow the shape of the piece keeping 5mm away to create your bleeding edge.
2- Press down firmly onto the cast and tidy up all the sides.
3- Create a few RUN OFFS extending off the grounding channel to allow excess silicone (or other chosen product) to run out of.
4- Create TOUCH DOWNS, these will act as your anchor points. If you were to do a fibre glass on fibre class mould you would screw the two pieces together to keep the pressure and the mould in place.
5. For plaster casting it is recommended to then build a wall around the grounding (as done in creating flat pieces) so the plaster doesnt run any further than needed.
An example of grounding up with touch downs being added - no run offs.
Touch downs.
These are holes made by either drilling striaght into the positive cast or carved out of the clay flashing. The image on the right is an example of how the holes should be placed and their size. The reasons we create touch downs is so that the mold and the positive fit together percisely stopping then from moving around. They may also be reffered to as keys.
Flashing.
This is a piece of clay that is placed 5mm away from the edge of a sculpt, it can either be a strip approx. 1/2 inch wide or it can cover all exposed plaster past the 5mm border. Adding flashing on prior to molding will allow there to be a channel where the excess material can flow out of. This also has (depending on the size of the piece) little knotches coming off the flashing which pushes the excess material out of the channel. These parts can be referred to as run offs.
Cutting Edges.
A cutting edge is the point where the negative part of the mold comes into contact with the positive, creating a seperation of excess material from the prosthetic piece which is how you get your paper thin edges.
Clay wall.
This step can be optional depending on what mold you are making. To build a clay wall you need to create a thick and tall wall that sits at 90 degrees against the surface pressing to get good contact with the surface to ensure it stays in place, it needs to hold the plaster in when molding. There are many different variations of the clay wall Debrecini (2013, p 175-177) talks about wrapping clay in cling film building a struchture for the wall out of wood then placing slabs of clay on the outside of them, this method is reccommended for full head sculpts rather than just faces as they need to be lay flat.
Release Agents.
These are products that are applied between the cast and the mold that allow the two parts to pull away (release) from each other easier that if the product was not used as the mold may get damaged if lots of pressure is needed to pull them away. There are two types of release agents:
Barrier - These work by creating a physical barrier between the two parts
- Al-cote and paraffin wax are commonly used
Reactive - This is also known as chemically active
- These 'are releases that have an active ingrediant that is usually some type of fatty acid, such as soap, that is dissolved in some sort of a carrier, such as alcohol (e.g., tincture of green soap). (Debreceni, 2013, p171)
Sealers.
These can be in liquid form of sprays that are used on materials that have pourous surfaces, their job is to seal the pours on the surface to stop moisture from penertrating through. These can also be used as release agents on certain types of mold materials.
Floating technique- used for large or full head prosthetics.
Full head prosthetics or large pieces may by built up using multiple smaller pieces that overlap however before molding there is a slightly different preperation method.
1. When preparing the lifecast, Debreceni (2013, p172) says:
If you are creating a makeup that will ultimately be cast in several pieces that will overlap, the intial life cast must first be coated with
a seperating agent such as Dentsply's Al-cote (liquid foil).
Not using a seperating agent between the clay and face cast will make removing the clay in intact pieces much more difficult. You will need the pieces to lift off seperatley so you can cast them individually.
2. Sculpt your design.
3. Decide where you want the different pieces to end and join. Cut the clay, making sure you go all the way to the positive cast a wooden tool is reccommended as to not damange you plaster cast (if this is you chosen material).
4. Choose a bowl or sink that is big enough so you entire sculpt can be submerged and fill with cold water.
5. Place the sculpture into the water and leave for 24 hours. If you are wanting to float a small piece than it will not need a full 24 hours.During this time the clay will remove itself from the positive cast this is called floating.
6. Remove any residue left of the clay and place on a replica life cast blending out the edges and put in any texture that might be needed/cleaned up. If it is a full head/large area you may want to use a cast of the smaller specific area which will make molding easier. Molding the pieces all on seperate casts also saves time when producing multiple pieces.
7. From here you would ground up the piece then mold follwing the procedure for the type of mold you will be producing.
Why cold water?
If you use warm water you will melt/exapnd the clay loosing the shape of you sculpting work.
Clay Recommendation
Monster Clay is great for sculpting appliance that will need to be floated. Because of the high wax content, Monster Clay will literally float off a gypsum buck (lifecast), whereas other clays often need assistance. (Debreceni, 2013, p 172)


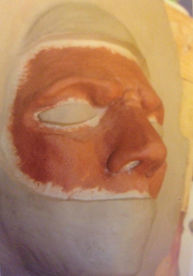


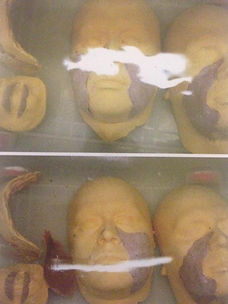
Figure 5.3
Dividing the sculpt up into smaller pieces
Figure 5.4
Removing the piece to be molded seperate
Figure 5.5
The Floating process before (top) and after (bottom)
Figure 5.1
Building a wooden structure for the clay wall
Figure 5.2
The wall in clay being built ontop of the wooden structure.
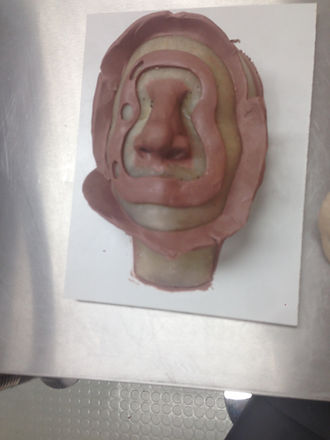
Figure 5.0
Flashing covering all exposed plaster.
Figure 5.6
Extra clay added that will be blended to make a smooth edge.
